The first photo shows the foot pad pulled off the orange housing bay, and the top part of the pad slipped out of the enclosure and placed to the left side of the enclosure. In the black enclosure is the circuit board revealed in photo 2 below.
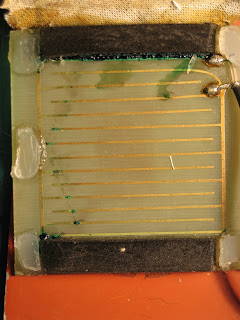
On the the right side of photo 2, you are looking at a firm ivory colored piece of plastic with a black rectangle rubber with a conductive set of bars printed on to it. This conductive pattern is placed at a 90° angle to the gold patterned circuit board revealed on the left. The circuit board consists of two disconnected circuit patterns connected to two wires that lead back into the main Patch of Shades enclosure. When the conductive black rubber is pressed against the circuit board lines, the circuit closes, the resistance is lowered as more pressure is added.
Photo 3 shows why my Patch of Shades was not working. A line of corrosion had made its way across the circuit lines, interfering with the pressure pad.
Some of the corrosion might have made its way onto the conductive pad as well.
Water, toe sweat, circuit board cleaning fluid, manufacturing by-product? We will never know...
Scrubbed both boards all clean with an acetone based circuit board cleaning fluid (probably not so good for the atmosphere, but cleans better than alcohol).
The key to easily putting it all back together...hot glue gun!!!! A hot glue gun will make it easy to re-wrap each piece of faux leather tightly enough, and also makes it easy to firmly remount the pad into the orange foot pedal area. Also, hot glue, while being a good tight hold, can also be peeled off and done over easily. I took advantage of this feature of hot glue several times during this repair, as I initially did not place the conductive pad in the correct orientation with the circuit board. If you are attempting this repair, careful observation of orientation during take apart will save you trouble later on.
In my next posting (whenever that occurs), I will upload some MP3s of the sounds that the various settings on the Patch of Shades avails me.


Thanks now I have a clue why mine might not be working.I have had it for 40 years.
ReplyDeleteI'm so glad my story is helpful to someone. It's such a lovely tool when it's working.
DeleteOn the POS Version 1 did you also pencil in the conductive bars on the black pressure pad?
ReplyDeleteSo I think a lot of pressure pads are failing, i'm sure it is the problem with mine as well. The blue oxidation is from the foam rubber spacers on both sides of the circuit board. Though it's a great idea to clean the gunk off i'm really not sure if it is what is causing the pad not to work. I think it may be the black pressure pad losing it's conductivity, this is why I ask the prev question. Also the black pressure pad is not 90%, the bars are parallel, they don't cross each other. That is how mine was and looking at the outline of goo your POSV1 in the pictures above it was parallel also. Thanks for this very helpful page!!!!!!!!
ReplyDeleteThe pencil lead/graphite trick is worth a try. If it causes too much conductivity, you can use the pencil eraser to remove some graphite. I think I used the graphite trick on both of my Patch of Shades units. It has been a decade since my first repair work, so my memories of it are mixed a bit with the work on the second unit.
ReplyDeleteYes, I vaguely remember trying it at 90 degrees and then having to open it back up and try it parallel, so you are probably correct on the orientation issue
ReplyDeleteThank you!!!! I will try the pencil trick. After some quick research a new piece of Velostat might be a good idea, all of a sudden I'm learning about pressure pads and conductive materials. Thanks again for this page as it gave me the courage to dig into my non working Patch.
ReplyDeleteOne final note: I decided to see once and for all if it was the pad by touching a copper wire from one lead on the pad to the other effectively opening and closing the circuit and Patch came to life with it's wonderful wah sounds!! So to anyone..if your Patch Of Shades lights up and the stomp switches are working turning on and off their led indicators but there is no effect it is highly likely your pressure pad is not working. In the end it was this web page that convinced me it was most likely the pad and I am so very grateful to you David. THANK YOU!!
ReplyDelete